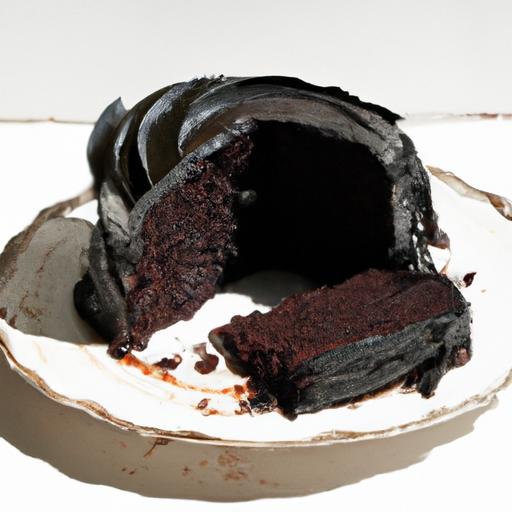
In the vibrant tapestry of brooklyn’s culinary scene, few desserts capture the borough’s rich spirit and bold flavors quite like the Brooklyn Blackout Cake. This decadent confection-layers of moist, dark chocolate cake enveloped in velvety chocolate pudding and crowned with a cloud of chocolate crumbs-is more than just a treat; it’s a beloved tradition steeped in history and indulgence. whether you’re a seasoned baker or a sweet-tooth explorer, diving into a Brooklyn Blackout Cake recipe offers a delicious journey into one of the city’s most iconic and irresistible desserts. Join us as we unravel the secrets behind this chocolate masterpiece and discover how to bring a piece of Brooklyn’s sweet legacy right into your kitchen.
The Rich History Behind Brooklyn Blackout Cake
Decadent Brooklyn Blackout Cake Recipe honors a beloved slice of New York’s culinary heritage. Originating during World War II, this dark, sumptuous cake gained its name from the city-wide blackout drills in Brooklyn. bakeries would craft this intensely chocolatey dessert to delight the community, combining moist chocolate cake layers with rich chocolate pudding and a signature fudgy crumb topping. Its nostalgic appeal lies in the perfect balance of textures-soft cake, creamy pudding, and a crunchy, fudge-spiked crumble-that makes every bite an experience.
This cake is more than just a dessert; it’s a festivity of enduring tradition and Brooklyn’s resilient spirit. As a culinary content creator and food stylist, I’ve always found that mastering this richly layered chocolate delight connects us to old-school New York while allowing room for modern creativity.
prep and Cook Time
- Preparation: 30 minutes
- Cook Time: 35 minutes
- Cooling and Assembly: 1 hour
Yield
Serves 12 generous slices
Difficulty Level
Intermediate: Suitable for confident home bakers familiar with multi-step desserts
Ingredients
- For the Cake Layers:
- 1¾ cups all-purpose flour, sifted
- ¾ cup unsweetened cocoa powder, sifted
- 2 cups granulated sugar
- 1½ tsp baking powder
- 1½ tsp baking soda
- 1 tsp fine sea salt
- 2 large eggs, room temperature
- 1 cup whole milk
- ½ cup vegetable oil
- 2 tsp pure vanilla extract
- 1 cup boiling water
- For the Chocolate Pudding Filling:
- 2 cups whole milk
- ½ cup granulated sugar
- ⅓ cup unsweetened cocoa powder
- 3 tbsp cornstarch
- ¼ tsp salt
- 4 large egg yolks, lightly beaten
- 2 tbsp unsalted butter
- 1 tsp vanilla extract
- For the Fudge icing and Crumbled Topping:
- ¾ cup unsalted butter, softened
- 1¾ cups powdered sugar, sifted
- ¾ cup unsweetened cocoa powder
- ½ tsp fine sea salt
- 3 tbsp heavy cream (plus more to adjust consistency)
- 1 tsp vanilla extract
Instructions
- Preheat your oven to 350°F (175°C). Grease and flour three 8-inch round cake pans evenly for easy release.
- Combine dry cake ingredients: In a large bowl, sift together flour, cocoa powder, baking powder, baking soda, salt, and sugar. Whisk to fully incorporate.
- Whisk wet ingredients: In a separate bowl, beat eggs, milk, oil, and vanilla until smooth and combined.
- Mix batter: Gradually add wet to dry ingredients, stirring gently until just combined. Slowly stir in the boiling water-this will thin the batter but ensure intense chocolate richness.
- Bake layers: Divide batter evenly among pans. Bake for 30-35 minutes or until a toothpick inserted comes out with moist crumbs. Cool layers in pans for 10 minutes, then transfer to wire racks to cool completely.
- Prepare pudding: Whisk together cocoa powder, sugar, cornstarch, salt, and ½ cup milk in a saucepan until smooth. Stir in remaining milk and cook over medium heat, stirring constantly until thickened.
- Temper egg yolks: Slowly whisk about ½ cup of hot pudding into yolks, then return all to saucepan. Stir and cook 2 more minutes without boiling. Remove from heat,stir in butter and vanilla. Cover pudding with plastic wrap directly on surface to prevent skin, chill until firm.
- Make fudge icing: Beat butter until creamy. Sift together powdered sugar and cocoa and add gradually. Mix in salt,vanilla,and enough heavy cream to reach spreadable consistency.
- Assemble cake: Place first cake layer on cake board or plate. Spread a thick,even layer of chilled pudding.Repeat with the second layer. Top with final cake layer.
- Frost cake: Cover entire cake with fudge icing using an offset spatula. Reserve a small amount of icing for crumb topping.
- Create crumb topping: Using a fork or your fingers, crumble the remaining two cake layers’ edges or reserved cake scraps. Gently fold crumbs into leftover fudge icing-do not overmix.
- Finish the cake: Press the fudge-crumb mixture onto the top and sides of the frosted cake, creating the signature blackout effect.
- Chill: Refrigerate cake for at least 30 minutes to set frosting before slicing.
Tips for Crafting the Perfect Fudge Icing and Crumbled Topping
The fudge icing should be luxuriously smooth yet firm enough to hold textured crumbs without sliding. If your icing feels too soft, slowly add more powdered sugar. for too much stiffness, add a splash of heavy cream. Crumble cake pieces should be fine enough to mimic soil but not powdered. Keep the crumbs slightly moist by folding in a small portion of the icing-this helps them adhere beautifully to the cake while enhancing flavor. Avoid over-handling crumbs to maintain a light,tactile contrast.
Chef’s Notes
- substitutions: For dairy-free, use plant-based milk (like oat or almond) and vegan butter but expect slight texture changes.
- Make-ahead: Bake cake layers and prepare pudding a day before for ease. Assemble and frost on serving day for freshness.
- Storage: Keep refrigerated, covered tightly, for up to 4 days. Allow cake to come to room temperature 30 minutes before serving for best texture.
- Common pitfalls: Overbaking dries cake-start checking 5 minutes before time. Pudding thickening requires constant stirring to prevent lumps.
Serving Suggestions to Elevate Your Blackout Cake Experience
this decadent treat shines when served with a light dusting of cocoa powder and a sprig of fresh mint to brighten the visual plate.Pair slices with a dollop of whipped cream infused with a hint of espresso for a subtle bittersweet balance.For added crunch, sprinkle finely chopped toasted hazelnuts or pecans around the base. Accompany with a rich, dark roast coffee or creamy hot chocolate to accentuate the intense chocolate layers.

| Nutrient | Per Slice (1/12) |
|---|---|
| Calories | 430 kcal |
| Protein | 5 g |
| Carbohydrates | 55 g |
| Fat | 20 g |
for more classic cake recipes that celebrate rich textures, check out our Classic Chocolate Layer Cake Recipe. To explore the past origins of iconic cakes, this History of Chocolate Cake article offers an excellent overview.
Q&A
Q&A: Decadent Brooklyn Blackout Cake Recipe: A Sweet Tradition
Q1: What is a Brooklyn Blackout Cake, and why is it considered a sweet tradition?
A1: the Brooklyn Blackout cake is a legendary New York dessert, famous for its deep, dark chocolate layers, rich chocolate pudding filling, and a thick, crumbly chocolate cake crumb coating. It originated during World War II when blackout restrictions inspired bakers to create a cake so dark it almost disappeared in the shadows. Over time, it became a cherished staple in Brooklyn bakeries and family celebrations-a symbol of indulgence, comfort, and local pride.
Q2: What makes the Brooklyn Blackout Cake different from other chocolate cakes?
A2: Unlike typical chocolate cakes, the Brooklyn Blackout Cake features multiple layers of moist chocolate cake filled with luscious chocolate pudding. Instead of frosting, the cake is covered in cake crumbs from the same chocolate batter, which adds a unique texture and intensifies the chocolate experience. This crumb coating is what gives it that signature rustic yet elegant look.
Q3: What are the key ingredients for a decadent Brooklyn Blackout Cake?
A3: The heart of this cake lies in high-quality cocoa powder and bittersweet chocolate for the cake layers, homemade chocolate pudding for the filling, and cake crumbs for the coating. Fresh eggs, sugar, flour, buttermilk, and vanilla extract complete the list, ensuring balance between richness, moisture, and flavor depth. Each element works together to create the cake’s signature moistness and intense chocolate flavor.
Q4: Can this cake be made ahead of time?
A4: Absolutely! In fact, many bakers recommend preparing the pudding and cake layers in advance. Once assembled, chilling the cake for several hours or overnight not only helps the pudding set perfectly but also allows the flavors to meld beautifully. Just remember to bring the cake to room temperature before serving for the best texture.
Q5: Are there any tips for achieving the perfect crumb coating?
A5: yes! To get that perfect crumb coating, reserve a portion of the baked chocolate cake before assembling. Let it cool completely, then crumble it finely. After spreading the pudding and stacking the cake layers, gently press these crumbs onto the sides and top of the cake. Using your hands or a small offset spatula helps ensure the crumbs stick evenly, creating that classic Brooklyn blackout look.
Q6: How can I serve this decadent cake to highlight its rich flavors?
A6: Because the cake itself is deeply chocolatey and moist, it pairs beautifully with simple garnishes. A light dusting of powdered sugar, a few fresh berries, or a dollop of lightly whipped cream can add freshness without overpowering the cake. Serving it slightly warmed can also enhance the gooey pudding layers,turning each bite into a truly indulgent experience.
Q7: Is the Brooklyn Blackout Cake suitable for special occasions?
A7: Definitely! Its dramatic appearance and intense flavor profile make it a show-stopping centerpiece for birthdays, holidays, or any celebration worth remembering.The cake’s rich, multi-layered texture delights both young and old, making it a beloved choice wherever decadence is on the menu.
Q8: Can the recipe be adapted for gluten-free diets?
A8: yes-substituting regular flour with a high-quality gluten-free flour blend can produce delicious results. Pay close attention to the texture of the batter and pudding, as gluten-free flours sometimes require slight adjustments in liquid quantities. Experimenting with almond or coconut flour additions can also enhance moisture and flavor depth, keeping this sweet tradition accessible for many.
To Wrap It Up
As the final crumbs of this decadent Brooklyn Blackout Cake fade into memory, one thing is clear: this rich, chocolatey masterpiece is more than just a dessert-it’s a delicious tradition steeped in history and heart. Whether you’re baking it for a festive occasion or a quiet moment of indulgence, this cake tells a story of community, craftsmanship, and pure, unadulterated sweetness. So go ahead, slice into that velvety layer of chocolate goodness and savor a piece of Brooklyn’s sweet legacy-because some traditions are best enjoyed one luscious bite at a time.