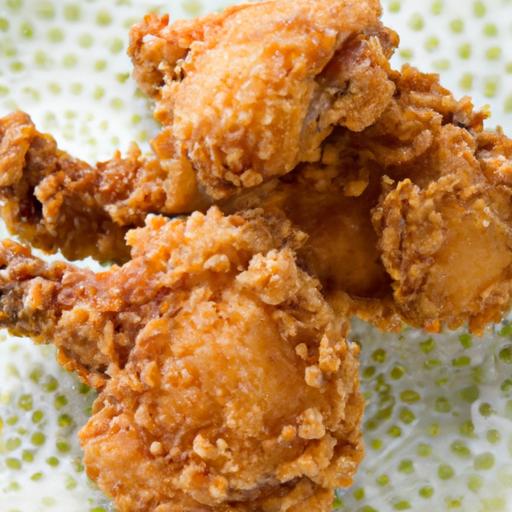
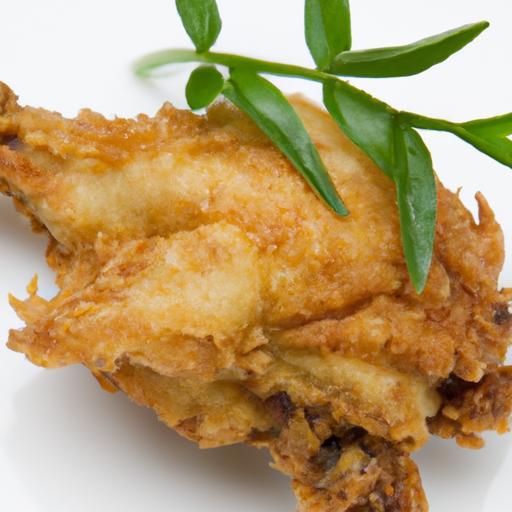
There’s something undeniably magical about biting into a piece of fried chicken that’s perfectly crispy on the outside while remaining tender and juicy on the inside. It’s a culinary harmony that delights the senses and elevates a simple ingredient into an unforgettable experience. But achieving that golden, crackling crust isn’t just luck-it’s science, technique, and a few well-guarded secrets combined.
In this ultimate guide to perfectly crispy fried chicken, we’ll take you beyond the basics, exploring everything from brining and seasoning to battering and frying methods. Whether you’re a home cook yearning to master this beloved classic or a food enthusiast eager to deepen your knowledge, prepare to embark on a flavorful journey that ends with nothing less than crispy perfection.
Choosing the ideal Chicken Cuts for Maximum crispiness
When striving for perfectly crispy fried chicken, the selection of cuts plays a pivotal role in achieving an irresistible crunch paired with juicy tenderness inside. The focus keyword,perfectly crispy fried chicken,starts with understanding that dark and white meat behave differently during frying.
For the crispiest bite, bone-in cuts like chicken thighs and drumsticks excel due to their higher fat content, which keeps the meat tender and flavorful without drying out. Meanwhile, chicken breasts can be included but require careful brining and breading to avoid dryness. combining multiple cuts ensures varied textures and visual appeal on your plate.
Mastering the Marinade and Brine for Juicy Flavor
The secret to juicy meat beneath a crunchy crust lies in a balanced marinade or brine that penetrates deeply. A simple but effective brine with kosher salt, sugar, and aromatic herbs softens fibers and retains moisture throughout frying. For perfectly crispy fried chicken, brining for at least 4 hours is recommended but overnight yields the best results.
In addition to a saltwater soak, a buttermilk marinade enriched with garlic, paprika, and cayenne drives flavor directly into the meat and slightly tenderizes it. The acidity of buttermilk reacts with the proteins, making the chicken delightfully succulent once fried.
The Science Behind the Perfect Breading and Coating
Creating a durable, crunchy coating involves layering and technique. A classic double-dip method-first dredging in seasoned flour, then dipping in your marinade again before a final flour coating-builds a gripping crust that doesn’t slide off during frying.
Incorporate additives such as cornstarch or potato starch into your flour mix to intensify crispiness. Additionally, properly seasoning your flour with salt, pepper, and smoked paprika not only enhances flavor but aids in forming that golden-brown exterior that is just as appetizing visually as it is in texture.
Frying Techniques That Guarantee Crunchy Golden Perfection
Perfectly crispy fried chicken demands attention to oil temperature and frying time. Maintaining a steady temperature around 325°F to 350°F (163°C to 177°C) ensures the chicken cooks through without burning the crust. Use a deep, heavy-bottomed skillet or a cast-iron Dutch oven for even heat distribution.
Fry in small batches to avoid overcrowding-the temperature drop results in soggy, greasy chicken rather than crunchy perfection. Flip the pieces gently midway to promote even browning. After frying, resting the chicken on a wire rack keeps the crust crisp by allowing excess oil to drip away.
Prep and Cook Time
- preparation: 20 minutes (plus 4-12 hours for brining)
- Cooking: 20-25 minutes
- Total: Approximately 5 hours including brine time
Yield
Serves 4 hungry guests with assorted chicken cuts.
Difficulty Level
Medium – Requires attention to timing and temperature control but achievable with practice.
Ingredients
- 3 pounds bone-in, skin-on chicken thighs and drumsticks
- 4 cups buttermilk
- ¼ cup kosher salt
- 2 tablespoons sugar
- 2 cups all-purpose flour, sifted
- ½ cup cornstarch
- 1 tablespoon smoked paprika
- 1 tablespoon garlic powder
- 1 teaspoon cayenne pepper (optional)
- 1 teaspoon black pepper
- Vegetable oil or peanut oil for frying
Instructions
- Prepare the brine: In a large bowl, combine 4 cups water, kosher salt, and sugar. Stir until dissolved. Submerge chicken pieces, cover, and refrigerate for 4 to 12 hours.
- Marinate in buttermilk: After brining, drain chicken and pat dry. Transfer to a new bowl and pour over the buttermilk, ensuring all pieces are coated. Optionally add smoked paprika and cayenne to the buttermilk for extra flavor. Refrigerate for at least 2 hours.
- Mix the dry coating: In a wide, shallow dish, whisk together flour, cornstarch, garlic powder, smoked paprika, black pepper, and a pinch of salt.
- Dredge the chicken: Remove a piece from buttermilk, allowing excess to drip off. Dredge thoroughly in the flour mixture,pressing gently to adhere. Repeat a second dip into buttermilk and final flour dredge to build a thick, crispy coating.
- Heat oil: in a cast iron skillet or deep fryer, heat oil to 325°F (use a thermometer for accuracy). There should be at least 2 inches of oil to submerge half the chicken pieces.
- Fry in batches: Place chicken pieces gently into oil, avoiding overcrowding. Fry for 8-10 minutes per side or until golden brown and internal temperature reaches 165°F.
- Drain and rest: Remove chicken with a slotted spoon and place on a wire rack set over a baking sheet to drain excess oil and preserve crispness.
- Serve warm: Garnish with fresh herbs such as thyme or parsley, and optionally accompany with pickles or your favorite dipping sauce.
Tips for Success
- Brine thoroughly: Don’t skip the brine-it’s vital for juicy chicken that remains tender after frying.
- Oil temperature control: invest in a good deep-fry thermometer to keep oil steady and avoid greasy, soggy crusts.
- Double-dip coating: Building layers of flour and buttermilk ensures a crunchy, considerable crust.
- Make-ahead: Brined and marinated chicken can be prepped the night before for easier day-of cooking.
- Substitution note: Buttermilk powder mixed with milk can be used if fresh buttermilk is unavailable.
Serving Suggestions
Present your perfectly crispy fried chicken on a rustic wooden board or vintage enamelware for a nostalgic feel. Accompany with crisp coleslaw, buttery mashed potatoes, or a tangy honey-mustard dipping sauce. Fresh lemon wedges and a sprinkle of flaky sea salt over the chicken elevate each bite with brightness and subtle seasoning contrast.

| Nutritional Info (per serving) | Calories | Protein | Carbs | Fat |
|---|---|---|---|---|
| Bone-in Chicken (200g) | 450 kcal | 35 g | 20 g | 28 g |
For related tips on seasoning and breading, check out our spice rub guide. For more on oil safety and frying methods, the foodsafety.gov frying safety tips are an excellent resource.
Q&A
Q&A: the Ultimate Guide to Perfectly Crispy Fried Chicken
Q1: What’s the secret to achieving that irresistible,ultra-crispy coating on fried chicken?
A1: The secret lies in the coating technique and the right balance of moisture and dryness. Double-dipping-first in a seasoned wet batter or buttermilk, then in a well-seasoned flour mixture-creates layers that crisp up beautifully. Also, adding a bit of cornstarch or rice flour to your flour mix helps develop an extra-crunchy crust.
Q2: Does marinating the chicken really make a difference?
A2: absolutely! Marinating chicken in buttermilk or a tangy brine softens the meat and infuses it with flavor. The acidity gently breaks down proteins, resulting in a tender, juicy interior that contrasts perfectly with the crispy exterior.
Q3: how hot should the oil be for frying?
A3: Maintaining the oil temperature between 325°F and 350°F (163°C-177°C) is crucial. Too hot, and the crust will burn before the meat cooks through. Too cool, and your chicken will turn out soggy and greasy. Use a deep-fry thermometer to keep your oil steady.
Q4: Can I use diffrent types of flour for the coating?
A4: Definitely! While all-purpose flour is classic, mixing in a portion of cornstarch or rice flour can enhance crispiness.Some cooks even add a bit of chickpea flour or gluten-free blends for a unique texture and flavor.
Q5: What role do spices and seasonings play in the crust?
A5: They’re the soul of your fried chicken’s flavor. don’t just season the chicken-infuse your dredging flour with a blend of spices like paprika, garlic powder, cayenne, black pepper, and dried herbs. this way, every crunchy bite packs a burst of seasoning.
Q6: Should I fry chicken pieces all at once or in batches?
A6: Fry in batches! Overcrowding the pot drops the oil temperature drastically, resulting in greasy, under-crisped chicken. Give each piece room to sizzle and brown evenly.
Q7: What’s the best way to drain and rest fried chicken after cooking?
A7: Drain fried chicken on a wire rack set over a baking sheet rather of paper towels. This prevents sogginess by allowing air circulation. Let it rest for a few minutes-this helps the juices redistribute and the crust firm up.
Q8: can I prepare fried chicken ahead of time and still keep it crispy?
A8: Yes, with careful reheating! Cool the chicken completely, then store it uncovered in the fridge to avoid trapping steam. Reheat in a hot oven (about 400°F/204°C) on a wire rack to crisp the coating back up without drying out the meat.
Q9: What cuts of chicken work best for frying?
A9: Bone-in,skin-on pieces like thighs,drumsticks,and breasts deliver juicy meat and flavorful skin. The bones help retain moisture during cooking, and the skin crisps up wonderfully.
Q10: How can I make my fried chicken gluten-free while keeping that perfect crisp?
A10: Swap customary flour for a combination of rice flour, cornstarch, and gluten-free blends. Ensure your seasoning and coatings are gluten-free too. This approach keeps the crunch intact without any wheat ingredients.
Ready to fry up the ultimate crispy chicken? Remember: tender inside, bold spices, and that golden, crackly crust make all the difference. Happy frying!
In Retrospect
With these tips and techniques in hand, achieving perfectly crispy fried chicken is no longer a culinary mystery but a tasty reality waiting in your kitchen. from the ideal marinade to the secret flour mix and the artful frying temperature, every step brings you closer to that golden, crackling crust and juicy, tender meat inside. So go ahead-embrace the sizzle, summon your favorite spices, and let your skillet sing. Because once you master the craft, every bite of your homemade fried chicken will be a satisfying symphony of crispiness and flavor, worthy of sharing and savoring again and again. Happy frying!