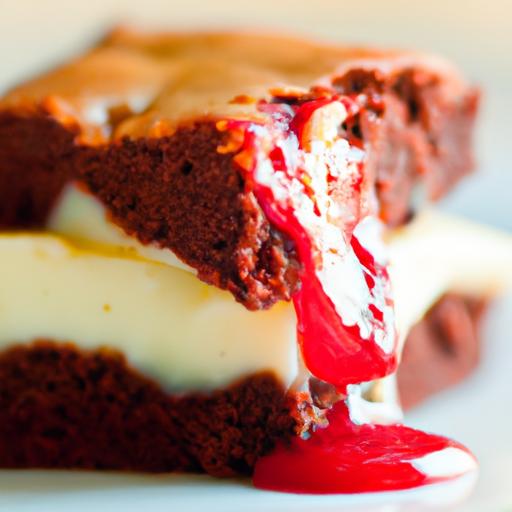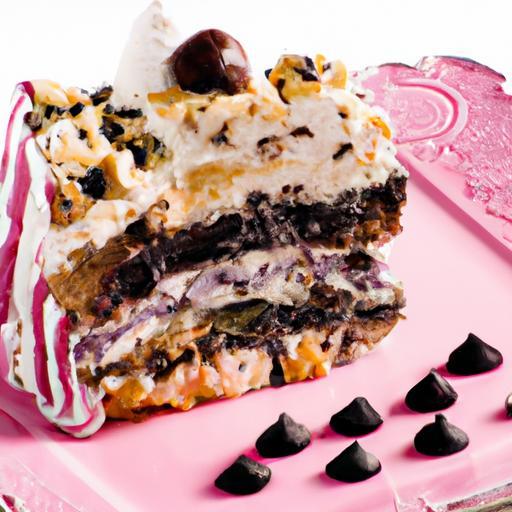

When classic desserts collide, magic happens-and few combinations enchant the palate quite like the union of rich red velvet and creamy cheesecake. Enter the decadent red velvet cheesecake brownie: a luscious sweet twist that marries the velvety tenderness of red velvet cake with the silky, tangy smoothness of cheesecake, all baked into one irresistible treat.
Whether you’re a brownie purist or a cheesecake enthusiast, this indulgent dessert promises a sensational experience with every bite, elevating familiar flavors into a elegant delight that’s perfect for celebrations, cozy nights, or any moment craving a touch of luxury. In this article, we’ll explore what makes these brownies so captivating, share tips on mastering their texture and balance, and inspire you to savor a decadent dessert reinvented.
Decadent Red Velvet Cheesecake Brownies: A Sweet Twist
Decadent Red Velvet Cheesecake Brownies blend the rich, luscious flavors of velvety red velvet cake with the creamy tang of classic cheesecake, creating a dessert experience that’s both classic and unexpected. This harmonious fusion captivates with its striking marbled appearance and divinely moist texture, making it a favorite for celebrations or any moment demanding a sweet indulgence.
Prep and cook Time
- Preparation: 25 minutes
- Cooking: 35 minutes
- Cooling: 1 hour
Yield
Approximately 16 rich, generous squares
Difficulty Level
Medium – Perfect for bakers ready to elevate their dessert game with marbling techniques and layered flavors
Ingredients
- For the Red Velvet Brownie Layer:
- 1 cup all-purpose flour, sifted
- 1/2 cup unsweetened cocoa powder, high quality
- 3/4 cup granulated sugar
- 1/4 cup unsalted butter, melted and cooled
- 2 large eggs
- 1 tbsp red food coloring
- 1 tsp vanilla extract
- 1/2 tsp baking powder
- 1/4 tsp salt
- 1 tsp white vinegar
- For the Cheesecake Layer:
- 8 oz cream cheese, softened
- 1/2 cup granulated sugar
- 1 large egg
- 1 tsp vanilla extract
- 1 tbsp all-purpose flour
Instructions
- Prepare your pan: preheat the oven to 350°F (175°C).Line an 8×8-inch square baking pan with parchment paper, leaving an overhang for easy removal.
- Mix the dry ingredients for the red velvet brownie: In a medium bowl, whisk together the flour, cocoa powder, baking powder, and salt.
- Combine wet ingredients: In a large bowl, whisk the melted butter and sugar until combined. Add eggs, one at a time, beating well after each. Stir in vanilla extract, red food coloring, and white vinegar until vibrant and smooth.
- Incorporate dry into wet: Gradually fold the dry mixture into wet, mixing until smooth but do not overmix; the batter should be thick and velvety.
- Make the cheesecake layer: In a separate bowl,beat the cream cheese and sugar until creamy and smooth. add the egg, vanilla, and flour, mixing gently until just combined.
- Layer the batters: Pour half of the red velvet batter into the prepared pan, smoothing evenly. Dollop half of the cheesecake mixture over it in spoonfuls, then top with the remaining red velvet batter.Finish by dropping spoonfuls of the remaining cheesecake over the top.
- Create the marbled effect: Using a skewer or a thin knife, swirl through the batters with gentle, sweeping motions. Avoid over-swizzling – aim for visually distinct ribbons of both colors.
- bake to perfection: Place the pan in the oven and bake for 30-35 minutes or until the edges are set, and a toothpick inserted in the center comes out with moist crumbs but no raw batter.
- Cool entirely: Allow the brownies to cool in the pan on a wire rack for at least 1 hour before slicing. Cooling solidifies the layers for clean, gorgeous cuts.
Chef’s Notes: Tips for Success
- Ingredient choice: Use full-fat cream cheese for the richest cheesecake layer. Avoid low-fat versions as they can alter texture.
- Red food coloring: Gel or paste food coloring gives a more vivid hue without thinning the batter.
- Temperature matters: Ensure cream cheese is softened but not melted; this helps achieve that silky cheesecake smoothness.
- Swirling technique: For a more dramatic marbled look, swirl in a figure-eight motion and resist heavy stirring.
- Make ahead: These brownies hold beautifully in the fridge for up to 4 days; warm slightly before serving for that freshly-baked feel.
- Freezing tip: Freeze cooled, sliced brownies in airtight containers for up to 2 months. Thaw overnight in the refrigerator.
Serving Suggestions
The stunning marbled presentation of these brownies makes it tempting to serve them as-is,but elevate your dessert table with these ideas:
- Dust the top lightly with confectioners’ sugar or cocoa powder to enhance the swirls.
- Pair squares with a dollop of whipped cream and fresh berries for a bright contrast.
- Drizzle a fine stream of warm classic chocolate ganache to add an extra layer of decadence.
- Serve chilled alongside a cup of rich coffee or creamy hot chocolate for ultimate indulgence.
| nutrient | Per Serving (1 Brownie) |
|---|---|
| Calories | 210 kcal |
| Protein | 3 g |
| Carbohydrates | 28 g |
| fat | 10 g |

Ready to venture further? Discover our Guide to Perfect Cheesecake for more insights into creamy, dreamy desserts that impress every time.
Q&A
Q&A: Decadent Red Velvet Cheesecake Brownies – A Sweet Twist
Q1: What makes Red Velvet Cheesecake Brownies different from traditional brownies?
A1: Red Velvet Cheesecake Brownies combine the rich, fudgy texture of classic brownies with the vibrant, velvety crumb of red velvet cake, all swirled with luscious cheesecake. This trio creates a multi-dimensional dessert experience-moist, creamy, and indulgently sweet with a hint of cocoa and a tang from cream cheese.
Q2: How do I achieve the perfect swirl effect in these brownies?
A2: The key is to dollop spoonfuls of cheesecake batter onto the red velvet brownie base, then gently swirl using a butter knife or skewer. The motion should be fluid but not overdone; you want distinct marbled patterns where the two batters meet-this visual appeal enhances both the presentation and the textural contrast.
Q3: Can I make these brownies ahead of time?
A3: Absolutely! These brownies actually benefit from resting. After baking, allow them to cool completely, then refrigerate for at least 2 hours or overnight. This chilling step helps the cheesecake layer set firmly, making cutting cleaner and the flavors more pronounced.
Q4: Are there any tips for baking to ensure the cheesecake layer doesn’t crack?
A4: To minimize cracking, avoid overbaking. As the cheesecake batter is delicate, bake just until the edges are set and the center still jiggles slightly.Also, having all ingredients at room temperature before mixing helps create a smoother cheesecake batter less prone to cracking under heat.
Q5: Can I use a boxed mix for the red velvet brownie part?
A5: While a boxed red velvet mix can work for convenience, homemade batters allow greater control over texture and flavor intensity. Making your own brownie base lets you tweak cocoa levels,sweetness,and dye for the perfect canvas that balances the creamy cheesecake topping.
Q6: What’s a good way to serve these brownies for guests?
A6: Present these brownies chilled and cut into small squares to highlight the gorgeous red, white, and chocolate marbling. Pair with a dusting of powdered sugar or a drizzle of white chocolate ganache for added glam. They’re perfect for celebrations or as a show-stopping dessert at parties.
Q7: Are there any creative variations you recommend?
A7: For a fun twist, try adding white chocolate chips or mini dark chocolate chunks to the brownie batter for unexpected bursts of flavor. Another idea is incorporating a hint of espresso powder into the red velvet mix to deepen the chocolate notes without overpowering the red velvet essence.
Q8: How do I store leftovers, and how long will they stay fresh?
A8: Store brownies in an airtight container in the refrigerator for up to 4-5 days.Because of the cheesecake layer, refrigeration is essential to maintain freshness and texture. Bring them to room temperature or warm slightly before serving for a softer bite.
Q9: Can these brownies be made gluten-free?
A9: Yes! Substitute all-purpose flour with a quality gluten-free flour blend that mimics regular flour’s texture. Be sure the baking powder and other ingredients are gluten-free as well. The cheesecake layer remains naturally gluten-free, so the flavor should stay wonderfully intact.
Q10: What inspired the creation of Red Velvet Cheesecake Brownies?
A10: This dessert was born from a love of both classic red velvet cake and the creamy decadence of cheesecake. Combining the two with the fudgy delight of brownies elevates the idea of layered desserts to a new level-offering a bite that’s as visually stunning as it is deliciously complex. It’s a sweet twist designed to surprise and satisfy any dessert lover!
In Retrospect
In the realm where rich chocolate meets velvety cream cheese, these decadent red velvet cheesecake brownies carve out a unique sweet sensation that’s impossible to resist. Whether you’re a brownie purist or a cheesecake enthusiast, this luscious fusion offers the best of both worlds-moist, vibrant red velvet swirled with silky cheesecake goodness. Perfect for celebrations or an indulgent treat any day, these brownies redefine dessert decadence with every bite. So next time you crave something exceptional, remember: a sweet twist is just a slice away.